How to Fix performance and memory issues in Eclipse or Force.com IDE

Fixing performance and memory issues in Eclipse or Force.com IDE
    Eclipse needs a decent amount of heap(Memory | RAM) to work smoothly, minimal heap sizes start from 256 MB RAM and upper limit to that value usually depends on the eclipse plugins and amount of physical RAM installed on your machine.
    Chances of eclipse being slow on low heap configuration are high, this is because you are overloading your processor and disk in classic RAM <> Disk swap cycles and CPU processing going on during the same. If this heap falls below a certain level, you might see Eclipse crash with errors like “OutOfMemoryError: Java heap space”.
    This post tries to cover a couple of Eclipse flavours/variants and ways to fix performance and memory issues on the same. As Force.com IDE itself is based on Eclipse, so most of the tips apply to Force.com IDE users as well.

    How to fix Performance ?

    One simple way to boost performance is to use an extremely good configuration machine. But that also not guarantees a good performance if your IDE is not having good defaults. Here are few tips that might help

    Too many plugins

    Having an Eclipse running with too many un-used plugins doesn’t helps. I have seen developers downloading Eclipse variants with support of lots of languages and features, most of which we usually don’t need. A good example is Force.com IDE, some developers tend to download JEE version of eclipse and install Force.com IDE as a plugin on top of that, this combination is of no use until you are JEE developer your self.
    Recommended way is to download the minimal version of eclipse and get the job down with the really required plugins.
    • Force.com developers: best bet is to use standalone version of Force.com IDE, which is really a low fat version of Eclipse with the basic required features. I personally use it for all Force.com related development and find it good and better in startup and normal usage speeds.  One can download standalone version from here :http://wiki.developerforce.com/page/Force.com_IDE_Installation
    • Java/JEE developers: Their are many options and rich suite of plugins available. You can make best judgement based on nature of your work, mostly JEE version of eclipse would suffice for normal JEE developer, and can be enhanced with good plugins like SVN(Subversive) and Mavens(M2E). But if you are using spring core and plan to opt Spring Tool Suite for the same, you might be making mistake by opting something too heavy that is no where required at all. This doesn’t means STS is a bad tool, make sure you need that STS goodness if you are planning to go for it Smile 
    One way that worked best for me is to have a second experimental eclipse installation, that is for experimental use only. For ex. you read about Android development and excitement to develop something makes you install the android plugin for eclipse. If this exercise is done in experimental eclipse installation it would help a lot, as you will be done with your research and in case something goes wrong during plugin installation, your main working eclipse copy is not disturbed at all.
    Once you feel that a plugin in experimental installation is of real good use and stable, you can move it to the core Eclipse installation. I know we have un-install plugin feature, but that has messed me a few times by leaving traces of crap.

    Too many open projects and files

    We end up checking out or creating multiple projects for various clients or own research. Eclipse housekeeping and RAM usage boosts with the number of open projects and files in workspace, a decent boost can be noticed by closing unused projects in workspace. I usually keep multiple eclipse workspaces for various stuff like
    • Client projects
    • Personal Apps
    • Research Projects or Open Source work

    Increasing heap size

    If you are having a good amount of RAM installed/freely available on your machine, you can ignore the tips above and just boost the Eclipse heap setting to make the most out of the available RAM.
    Following table lists various eclipse variants and video tutorials for each to tune the heap size.
    Eclipse VariantOSVideo: How to fix the heap ?
    Eclipse standardMac
    STS (Spring Tool Suite)Mac
    Force.com Standalone IDEMac
    Force.com Standalone IDEWindows
    EclipseOtherTry following the steps in above videos, configuration should be similar

    Incoming Search: 
    How to Fix performance and memory issues in Eclipse or Force.com IDE, eclipse ide for salesforce, salesforce development in eclipse, eclipse for salesforce, salesforce eclipse

    How add a detail button to your Objects?


    How add a detail button to your Objects?

    Let's imagine that we have a VF page which receive two address URL parameters (From and T0) and show us the driving direction from the "from" address to the "to" address.

    Using the page we want to add a detail button to Sales Force Account object called "Driving Direction" and once the Sales Rep click on this button can actually view the driving directions from his office to the client's (Account's) location.

    Neat, ha?

    So, this is how we go about and do this:

    1. Go to "Setup" page (link located on the top right corner of the page)
    2. Under the "App Setup" expand the "Customize" item
    3. Find Account object and expand it
    4. Click on "Buttons and Links"
    5. On the "Custom Links and Buttons" section click on "New"
    6. Enter Label, Name, Description and Select "Detail Page Button" as type
    7. Behavior="Display in new Window" and Content source="URL"
    8. Let's imagine that your VF page name is "MapDirections". Then enter the following code into content of the button:


    /apex/MapDirections?to={!Account.BillingPostalCode},{!Account.BillingState},{!Account.BillingCountry}&from={!$User.PostalCode},{!$User.State},{!$User.Country}

    The above text includes a combination of a URL text and a few tags which later on will be replaced with actual data.

    Generally tags follow this format: {!field-name} . You can easily see what field types and field names are available to you using the two dropdown lists provided by Sales Force.

    And with this we are done with creating the Detail button however we won't be able to see it on the Account's detail page before we add it into the Account's Layout.

    In order to add the button to the Account's layout:
    1. Go to: Customize -> Accounts --> Page Layouts
    2. Edit any or all page layout on which the Custom Button should be visible
    3. Once you click on "Edit" layout button you can view the Account's layout page
    4. On the "Button Section" double click on "Detail Buttons"
    5. A new window opens up, look at the "Custom Buttons" section your button must be listed there.
    6. Add the button to the "Selected Buttons" list and click on.
    7. Save the Layout and now you will be able to see your button as it is depicted below:

    Incoming Search:

    open related list when button clicked in salesforce, open related list of an object when button clicked, adding detail button to objects in salesforce

    A Visualforce Component that Beautifies actionStatus!


    I have always liked to be able to have one of those fancy AJAX "loading..." messages for my AJAX postback calls. The background screen grays out, all components (textboxes, buttons, etc) become disabled and a little box says "Working on your request..." or "Running..." with that famous GIF animator of a spinning wheel and hey, I finally did it!

    In this article I will show how to design the HTML to place the loading message into the center of the screen and gray out the background and the whole nine yards...

    In this example I will first create a Visualforce component so that potentially I could use my beautiful "loading..." message on every page I desire, furthermore by forming it as a Component I can parameterize the look and feel of it and easily deploy it into different pages with different coloring styles.

    In order to create a new Component click on the "setup" link on the right top corner of the page and find "Develop" item on the left hand-side and expand it, and click on "Components". Alternatively you can browse:
    http://yourinstance.salesforce.ccom/apexcomponent/{YourComponentName}

    Below you will be to get the code that goes into the component. The HTML code includes two Div elements, one for the gray background and the other for the actual box that the message is shown in and a javascript peice that adjusts the sizes of the div element based on the client browser's resolution and avialable place.


    <apex:component >
    <!-- Attribute Definitions -->
    <apex:attribute name="BorderColor" type="String" required="true" description=""></apex:attribute>
    <apex:attribute name="Width" type="String" required="true" description=""></apex:attribute>
    <apex:attribute name="Height" type="String" required="true" description=""></apex:attribute>
    <apex:attribute name="BackColor" type="String" required="true" description=""></apex:attribute>
    <apex:attribute name="BackColor" type="String" required="true" description=""></apex:attribute>
    <apex:attribute name="BorderSize" type="String" required="true" description=""></apex:attribute>
    <apex:attribute name="ImageUrl" type="String" required="false" description=""></apex:attribute>
    <apex:attribute name="Message" type="String" required="false" description=""></apex:attribute>
    <apex:attribute name="messageStyle" type="String" required="false" description="Message inline style"></apex:attribute>
    <apex:attribute name="BorderStyle" type="String" required="false" description="Message box border style: solid, outset, inset, etc"></apex:attribute>

    <div id="salesforceSource_blurybackground" style="position:absolute; left:1px; top:1px; width:100%; height:100%; text-align:center; vertical-align: middle; background-color: #dcdcdc; opacity:0.6;filter:alpha(opacity=60)">
    </div>
    <div id="salesFroceSource_StatusBox" style="position:absolute; left:100px; top: 100px;width: {!Width}; height:{!Height}; opacity:1;filter:alpha(opacity=100)">
    <table border="{!BorderSize}" cellpadding="0" cellspacing="0" style="border-left-color: {!BorderColor};
    border-bottom-color: {!BorderColor}; width: {!Width}; border-top-color: {!BorderColor}; height:{!Height};
    border-right-color:{!BorderColor}; border-style:{!BorderStyle}; background-color:{!BackColor};">
    <tr>
    <td align="left" valign="top">
    <table border="0" cellpadding="4" cellspacing="0" style="width: 100%; height: 100%">
    <tr>
    <td style="border-bottom-color:{!BorderColor}; border-bottom-width:1px; border-bottom-style:solid;vertical-align:middle;">
    <img src="{!ImageUrl}"/></td>
    <td style="border-bottom-color:{!BorderColor}; border-bottom-width:1px; border-bottom-style:solid;vertical-align:middle;{!messageStyle}">
    &nbsp;{!Message}</td>
    </tr>
    </table>
    </td>
    </tr>
    </table>
    </div>
    <script type="text/javascript">
    var AgreementForm = document.getElementById("salesforceSource_blurybackground");
    AgreementForm.style.height = window.screen.availHeight + "px";
    AgreementForm.style.width = window.screen.availWidth + "px";

    var ContainerElem = document.getElementById("salesFroceSource_StatusBox");
    //ContainerElem.style.display = "block";
    AlignToCenter(ContainerElem);

    function AlignToCenter(Element)
    {
    var availableHeight = 0;
    var availableWidth = 0;
    if (Element.ownerDocument)
    {
    var docElement = Element.ownerDocument.documentElement;
    availableHeight = parseInt(docElement.clientHeight);
    if (availableHeight == "NaN") availableHeight = 0;

    availableWidth = parseInt(docElement.clientWidth);
    if (availableWidth == "NaN") availableWidth = 0;
    }

    if (availableHeight == 0 || availableHeight == "NaN")
    availableHeight = window.screen.availHeight - 200;
    if (availableWidth == 0 || availableWidth == "NaN")
    availableWidth = window.screen.availWidth - 100;

    var msgBoxTop = parseInt((availableHeight - parseInt(Element.clientHeight))/2);
    var msgBoxleft = parseInt((availableWidth - parseInt(Element.style.width))/2);

    if (msgBoxTop == "NaN" || msgBoxTop == 0)
    msgBoxTop = 100;

    Element.style.left = msgBoxleft + "px";
    Element.style.top = msgBoxTop + "px";
    }
    </script>
    </apex:component>

    Pay a good attention to the Attribute section of the of the component those lines will empower you to change the look of the component entirely!

    Ok, Now let's see how we can use this component. In Force.com in order to call your component you will need to call it a prefix tag called "c" and don't ask why because that's the way it is.


    <apex:actionStatus id="status">
    <apex:facet name="start">
    <c:enhancedActionStatus BackColor="#efefef" borderColor="#336699" borderSize="3" height="50px" width="120px" ImageUrl="{!$Resource.AjaxAnimation}" Message="Loading..." messageStyle="color:darkred;font-size:11pt;font-weight:bold;"/>
    </apex:facet>
    </apex:actionStatus>

    How to Create Custom Related-List on Visualforce Pages

    In the past few weeks in many cases I came across the requirement to add a custom list to the Object's detail page.

    The list should be just like related-lists such as "Open Activities" or "Google Docs, Notes, & Attachments", however it is suppose to view a list of data which is somehow relevant to the object but not necessarily from an object directly related to the current object's page.

    Let's consider this example, imagine we need to view a list of opportunities related to a Contact through it's Account relationship (not the ones that are directly linked to the Contact).


    This is to say that if Contact A is linked to Account X and Account X has 5 opportunities linked to it, by viewing Contact A's details we would be able to view those opportunities as well.

    Ok, now action, in order to do this we will need to create a new Visualforce Page and Controller extension.

    So I add this text in front of http://yourOrg.salesforce.com/apex/SampleDetailPage and create the new page instantly (This is only possible when you profile is set to work in developer mode).

    I set the page's Controller attribute to "Contact" and call my extension "SampleDetailPageCon".
    On the page all I need to do is to show the existing Contact details based on whatever active layout target user has chosen and then add my related-list to the bottom of the page. The page code goes like this:

    <apex:page standardController="Contact" extensions="sampleDetailPageCon">
    <style>
    .fewerMore { display: none;}
    </style>
    <apex:form >
    <apex:pageMessages />
    <apex:detail relatedList="true"></apex:detail>
    <apex:pageblock id="CustomList" title="Related Opportunities" >
    <apex:pageBlockTable value="{!oppz}" var="o" rendered="{!NOT(ISNULL(oppz))}">
    <apex:column value="{!o.Name}"/>
    <apex:column value="{!o.Account.Name}"/>
    <apex:column value="{!o.Type}"/>
    <apex:column value="{!o.Amount}"></apex:column>
    <apex:column value="{!o.CloseDate}"/>
    </apex:pageBlockTable>
    <apex:outputLabel value="No records to display" rendered="{!(ISNULL(oppz))}" styleClass="noRowsHeader"></apex:outputLabel>
    </apex:pageblock>
    </apex:form>
    </apex:page>


    A few tips, normally at the end of detail page Salesforce publishes a component for viewing a few more or a few less records to adjust the size of the page.

    Since our related list will be rendered under this component it might not be a bad idea to get rid of it. If you pay attention to be page's code you will see that a style tag has been added to the page that will just do that.

    Apart from this everything else is very straight forward. Now all we need to do is to extend the Contact's standard controller and make it able to generate a list of related Opportunities as well.

    Here is the Controller's Code:


    public class sampleDetailPageCon {
    private List<Opportunity> oppz;
    private Contact cntact;
    public sampleDetailPageCon(ApexPages.StandardController controller) {
    this.cntact= (Contact)controller.getRecord();
    }
    public List<Opportunity> getOppz()
    {
    Contact con = [Select id, Account.id FROM Contact where id = :cntact.id];
    if (con.Account == null)
    return null;
    oppz = [Select id, Name, Account.Name, CloseDate, Amount, Type from Opportunity where Account.id = :con.Account.id];
    return oppz;
    }
    }


    As you can see this also very simple. In the above code, I have just added a method called "getOppz()" in which I first try to see if the Contact is linked to any accounts and if yes then use the Account id to get a list of its Opportunities.


    That's it! Now if you need your page to be used by Salesforce as default detail page all you need to do is:
    • Go to: Setup -> Customize -> Contacts -> Buttons and Links
    • Click on "override" next to "View" label
    • Select "Visualforce Page" and then your page from the drop down list

    Now there is only one thing left, as you all have noticed every related-list has a hover feature on the top of the page where user can quickly view all the related-lists without scrolling down the whole page.


    Incoming Search:

    How to get related list in salesforce, related on custom page in salesforce, visualforce tag to display related list in salesforce, salesforce related list, related list coding

    How to Query and Use Data From and To Multiselect Picklists

    Working with Picklists essentially is rewarded since it limits the options of the user and standards what is valid as a value for a field in the system. As good as they are however they bring their own complexity with them.

    This is especially true when you are working with multi-select Picklists. Mostly Visualforce’s inputField is used to view multi-select Picklists as Salesforce team is working on it to be more effective and error-free.

    In this article we will see how to use the multi-select Picklists.

    First off, let’s see how we can load values into our Picklist and view it on our Visualforce page.
    Let’s say I have a custom multi-select Picklist field on my User object to define sales regions my users operate on.

    The picklist has values such as:
    • North America
    • Latin America
    • Europe
    • Asia
    • Middle East
    • Africa
    and so on

    In my controller class I add the following property:


    public class multiselectPicklist {
    private User salesRegions;

    public multiselectPicklist()
    {
    salesRegions = new User();
    }
    public User getSalesRegions() {
    return salesRegions;
    }
    public void setSalesRegions(User Value) {
    salesRegions = Value;
    }
    }


    As you can see it is enough to create a new User object and later on use the picklist field to show the values on your page. Unfortunately there is no other way through which you would more control over what values are shown on your multi-select control. May be in future Salesforce will supply a Component for multi-select operations.

    Please note that I have created a setter property as well that receives a User object. This setter allows us to later on read the selected values by user.

    Now that we have our controller ready we can program our page to view our multi-select picklist.
    in this example what I am trying to achieve is that to allow the user choose as many regions as he/she wants and them filter the Users of the system and view only those who are assigned to those regions.


    <apex:page controller="multiselectPicklist" tabStyle="User" sideBar="false">
    <apex:form >
    <apex:sectionHeader title="Users by Region Report"></apex:sectionHeader>

    <apex:pageBlock id="pageBlock" title="Search Filter">
    <apex:pageMessages ></apex:pageMessages>
    <apex:pageBlockSection title="Filters" columns="2" collapsible="true">
    <apex:inputField id="salesRegions" value="{!salesRegions.Sales_Regions__c}" ></apex:inputField>
    </apex:pageBlockSection>
    </apex:pageBlock>
    <apex:pageBlock id="searchResults" title="Results">
    <apex:pageBlockButtons >
    <apex:commandButton value="Run Report" action="{!runReport}" status="status" rerender="searchResults"></apex:commandButton>
    </apex:pageBlockButtons>
    <apex:pageMessages ></apex:pageMessages>
    <apex:pageBlockTable value="{!users}" var="u" rendered="{!NOT(ISNULL(users))}" rules="cols">
    <apex:column value="{!u.UserName}"></apex:column>
    <apex:column value="{!u.IsActive}"/>
    </apex:pageBlockTable>
    </apex:pageBlock>
    </apex:form>
    </apex:Page>


    Something that you should bear in mind is that even though multi-select option suggests that you should be dealing with a list of Strings as a result of user’s interaction with your control on the page all you will receive will just a semicolon separated string. It is your job to separate the values and use then in whatever endeavor you intend to have.


    Below on my button action I have demonstrated how you can read the selected values back and use them in your query to get a list of users in those sales regions:


    public PageReference runReport() {

    if (salesRegions.Sales_Regions__c == null || salesRegions.Sales_Regions__c == '') {
    apexPages.addmessage(new ApexPages.message(ApexPages.severity.INFO, 'Please select one or more regions first.'));
    return null;
    }
    // read the values into an array
    string[] regions = salesRegions.Sales_Regions__c.split(';',0);
    if (regions != null && regions.size() > 0)
    {
    //query the database based on the user's selection
    users = [select Username, IsActive, Id from user where Sales_Regions__c in :regions and IsActive = true order by Username];
    }

    return null;
    }

    private List<User> users;

    public List<User> getUsers()
    {
    return users;
    }
    }


    Incoming Search:
    How to Query Data from Multiselect Picklists, using multiselect picklist, how to get data from multi select picklist, methods in multi select picklist

    A Step by Step procedure for creating batch Apex and using Async Operations

    If you have tried before to remove custom object records in bulk from your org, you know the hassle you need to go through to export the records into an excel file and then have the DataLoader delete those records.

    Not only that, what if you need to perform further data integrity tasks before removing the records?

    Mass updating, inserting and other similar scenarios like this can be more conveniently handled with force.com's Batch Apex. With Batch Apex you can now build complex, long-running processes on the platform. This feature is very useful for time to time data cleansing, archiving or data quality improvement operations.

    One thing that you need to consider is that you should trigger the batch job using Apex code only and force.com by default does not provide scheduling feature your batchable Apex classes. In order to do that you need to write Apex class that implements a "Schedulable" interface.

    The following example shows how you can utilize the model to mass delete records of any object in force.com platform.

    In order to develop your Batch Apex, you need to create a new Apex class which extends "Database.Batchable" interface.

    This interface demands for three methods to be implemented:
    • start
    • execute
    • finish
    "start" method is called at the beginning of a batch Apex job. Use this method to collect the records (of objects) to be passed to the "execute" method for processing. The Apex engine, automatically breaks the massive numbers of records you selected into smaller batches and repeatedly calls the "execute" method until all records are processed.

    The "finish" method is called once all the batches are processed. You can use this method to carry out any post-processing operation such as sending out an email confirmation on the status of the batch operation.

    Let's take a closer look at each of these methods:


    global Database.QueryLocator start(Database.BatchableContext BC) {
    //passing the query string to the Database object.
    return Database.getQueryLocator(query);
    }

    Use the Database.getQueryLocator in the "start" method to dynamically load data into the Batch Apex class. Using a Querylocator object, the governor limit for the total number of records retrieved from the database is bypassed.

    Alternatively you can use the iterable when you need to create a complex scope for your batch job.

    Execute method:

    global void execute(Database.BatchableContext BC, List<sObject> scope) {

    // in this sample, we simply delete all the records in scope
    delete scope;
    }

    This method provides two parameters Database.BatchableContext and a list of records (referred to as "scope"). BatchableContext is generally used for tracking the progress of the batch job by all Batchable interface methods. We will use this class more in our "finish" method.

    Finish method:

    global void finish(Database.BatchableContext BC){
    // Get the ID of the AsyncApexJob representing this batch job
    // from Database.BatchableContext.
    // Query the AsyncApexJob object to retrieve the current job's information.

    AsyncApexJob a = [Select Id, Status, NumberOfErrors, JobItemsProcessed,
    TotalJobItems, CreatedBy.Email
    from AsyncApexJob where Id =:BC.getJobId()];
    // Send an email to the Apex job's submitter notifying of job completion.

    Messaging.SingleEmailMessage mail = new Messaging.SingleEmailMessage();
    String[] toAddresses = new String[] {a.CreatedBy.Email};
    mail.setToAddresses(toAddresses);
    mail.setSubject('Apex Sharing Recalculation ' + a.Status);
    mail.setPlainTextBody
    ('The batch Apex job processed ' + a.TotalJobItems +
    ' batches with '+ a.NumberOfErrors + ' failures.');
    Messaging.sendEmail(new Messaging.SingleEmailMessage[] { mail });
    }

    By using the BatchableContext we are able to retrieve the jobId of our batch job. AsyncApexJob object in force.com allows you to gain access to the status of the async jobs as shown in the above example.

    In this method I have utilized the Apex email library to send a notification to the owner of the batch job (whoever triggered the job in the first place).

    Now, let's put it all together:


    global class MassDeleteRecords implements  Database.Batchable<sObject> {

    global final string query;

    global MassDeleteRecords (String q)
    {
    query = q;
    }

    global Database.QueryLocator start(Database.BatchableContext BC){

    return Database.getQueryLocator(query);
    }

    global void execute(Database.BatchableContext BC, List<sObject> scope){

    delete scope;
    }


    global void finish(Database.BatchableContext BC){
    // Get the ID of the AsyncApexJob representing this batch job
    // from Database.BatchableContext.
    // Query the AsyncApexJob object to retrieve the current job's information.

    AsyncApexJob a = [Select Id, Status, NumberOfErrors, JobItemsProcessed,
    TotalJobItems, CreatedBy.Email
    from AsyncApexJob where Id =:BC.getJobId()];

    // Send an email to the Apex job's submitter notifying of job completion.
    Messaging.SingleEmailMessage mail = new Messaging.SingleEmailMessage();
    String[] toAddresses = new String[] {a.CreatedBy.Email};
    mail.setToAddresses(toAddresses);
    mail.setSubject('Apex Sharing Recalculation ' + a.Status);
    mail.setPlainTextBody('The batch Apex job processed ' + a.TotalJobItems +
    ' batches with '+ a.NumberOfErrors + ' failures.');

    Messaging.sendEmail(new Messaging.SingleEmailMessage[] { mail });
    }

    }

    Ok, that's as far as we go for the Batchable Apex class in this article.

    Now let's write the code in Apex to run the class and test it:

    String query = 'SELECT id, name FROM Account WHERE OwnerId = \'00520000000h57J\'';
    MassDeleteRecords batchApex = new MassDeleteRecords(query );
    ID batchprocessid = Database.executeBatch(batchApex);

    The above code removes all accounts that the user id= 00520000000h57J owns them.

    As it is apparent, now you can run the batch job from within your Visualforce pages, triggers (with caution), etc.

    For governing limit and best practices documentation you can refer to the Apex Developer Guide.


    Incoming Search:

    how to create batch apex in salesforce, salesforce batch apex, creating batch apex in salesforce, async operations in salesforce, use of apex batch in salesforce, batch apex in salesforce, batch apex, methods in batch apex, salesforce batch apex methods, how to retrive batch id in salesforce

    Build a Salesforce Mobile Application with Magentrix

    Did you ever wanted a platform in which you could build your application, deploy and see it work on all devices! For many this a dream and some others this is quite bit of effort (money, time, etc) to achieve.

    A number of technologies exists today to help a developer build mobile applications, but it seems that these applications need to stack up on top of others classical existing options which results in maintaining two separate code, higher cost of ownership and more costly upgrades...

    One of the solutions that attempts to address the above issues and provide a more comprehensive and managed approach to building mobile apps that works for both classical desktop devices as well as tablets and cell phones is Magentrix.

    Magentrix for Salesforce, allows you to import Salesforce objects and build mobile applications or sites that are fully integrated with Salesforce. The approach is very much aligned with Cloud delivery model where you build your application on the cloud and run it with no deployment steps necessary.
    Also by doing this you are going to focus on building your application rather than worrying about adaptability, security, scalability, compatibility or even the fact that your code may be aging and getting obsolete as the technology evolves. This is because the abstraction layer that the Magentrix cloud development platform provides.

    If you like MVC development model, you are going to love this! 
    Let's jump into an example and explore how this is done.

    In this example, I am going to build a feedback form which gets the user's information and records it in Salesforce, additionally we can setup workflows let the necessary people know within the organization that someone cared to provide a feedback.

    Naturally we start in Salesforce by creating our feedback__c object. Then we add First Name, Last Name, Email and Message fields to this object.

    Next step to get into Magentrix for Salesforce instance and login! That's easy enough...
    Once you setup your integration that links Magentrix to your Salesforce.com organization instance.
    You can proceed with importing the Feedback__c object.

    I would go to Salesforce connector area in Magentrix and import our new Feedback object:

     
    Next I go ahead and set the security up for portal users so that the access to the data is secured within Magentrix:


    OK, we are all set to proceed to the next step, that is building our mobile feedback app!
    Even though at this point I could just turn to Magentrix drag and drop layout designer to create my form and publish it **NO CODING** required, I will switch the gear and do a custom UI for this example.

    I start with creating a custom Active Page that allows me to build our app there.

    Magentrix Active Page Editor
    My coding effort will be focused on two areas, as it is the case in most today's modern MVC development platforms:
    • View
    • Controller
    The view here is the page I have created and by clicking on "Add Custom Controller" I can add a controller class where I can write the logic (which will be very minimal in this case).

    I first explain the controller code, by default any Active Page Controller has a GET method called "Index". This method is called when user browses "/aspx/feedback", here is what I put there:


    [SerializeViewData]
    public class FeedbackController : AspxController
    {
    public override ActionResponse Index()
    {
    //make a new instance of the feedback object (all sfdc objects are prefixed in Magentrix).
    Force__Feedback__c feedback = new Force__Feedback__c();
    //send the model to the view
    return View(feedback);
    }

    [HttpPost]
    public ActionResponse Index(Force__Feedback__c feedback)
    {
    //creates the feedback record in SFDC
    bool isSccess = Create(feedback);
    if (isSccess)
    DataBag.ShowConfirmation = true;

    //returns the model back to the view
    return View(feedback);
    }
    }

    In the above I have an additional action method that is decorated as "HttpPost" which tells Magentrix that this action is triggered via "HTTP POST". Also the action defines the Feedback object as its input parameter, this definition asks Magentrix engine to bind the form posted data into the model and pass it to my method.

    By calling "Create" operation you can save the record into SFDC (simple ha?).
    DataBag is another way to pass data to the View from the Controller which is more dynamic and flexible, suitable for any additional data or instructions that need to be passed to the view other than the main object.

    Below the code that uses Magentrix standard user interface library to build the hybrid app. The Magentrix standard components apply the CSS styles provided by Magentrix theme for both classic and model devices.


    <aspx:AspxPage runat="server" Id="MyNewPage" title="Feedback">
    <body>
    <aspx:ViewPanel runat="server" title="Feedback" ButtonsLocation="bottom" visible='<%# !Bool(DataBag.ShowConfirmation) %>'>
    <action>
    <aspx:CommandButton runat="server" Text="Submit"/>
    </action>
    <body>
    <aspx:ViewSection runat="server" title="Personal Information" columns="one">
    <aspx:InputField runat="server" value="{!Model.FirstName__c}" required="true"/>
    <aspx:InputField runat="server" value="{!Model.LastName__c}" required="true"/>
    <aspx:InputField runat="server" value="{!Model.Email__c}" required="true"/>
    </aspx:ViewSection>
    <aspx:ViewSection runat="server" title="Message" columns="one">
    <aspx:InputField runat="server" value="{!Model.Message__c}" required="true"/>
    </aspx:ViewSection>
    </body>
    </aspx:ViewPanel>
    <aspx:ViewPanel runat="server" title="Feedback Confirmation" visible='<%# Bool(DataBag.ShowConfirmation) %>'>
    <body>
    <div class="content-box">
    <h2>Thank you for taking the time!</h2>
    <div>
    Your opinion matters the most to us, Thank you for help us by sharing your comments and suggestions.
    </div>
    </div>
    </body>
    </aspx:ViewPanel>
    </body>
    </aspx:AspxPage>


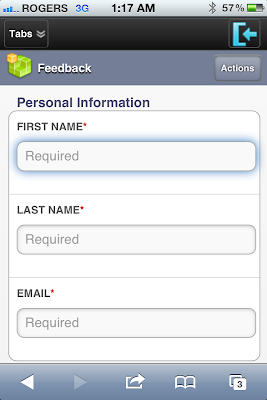
    I believe you are anxious to see the results?

    The classical view may look something like this:


    However the mobile view:


    You can try the app yourself:
    https://forceportal.magentrix.com/aspx/feedback


    Incoming Search:
    creating salesforce mobile applications, building salesforce mobile applications, how to build salesforce mobile applications, mobile applications in salesforce, mobile applications using apex, apex mobile application, visualforce mobile application